Last Updated on September 26, 2014
The lying incline curl with a barbell is a powerful variation of the traditional bicep curl, using an incline bench to change the angle of the movement. This unique angle shifts the focus to the biceps, providing a deeper stretch and targeting the long head of the biceps for better muscle development and definition. Similar to a preacher curl, the lying incline curl keeps your upper body stable, which minimizes swinging and helps isolate the biceps. Here, we’ll walk you through how to perform the lying incline curl correctly, explore the benefits, discuss variations, and share expert tips to maximize the exercise’s impact on your biceps.
Why the Lying Incline Curl is Essential for Bicep Development
- Enhanced Bicep Isolation
The lying incline curl minimizes momentum and body movement, allowing you to focus solely on the biceps. This isolation is crucial for developing defined and well-shaped arms, as it ensures the biceps do all the work. - Increased Range of Motion
By leaning face down on an incline bench, your arms can fully extend at the bottom, which increases the range of motion. This deeper stretch activates more muscle fibers, leading to better bicep growth and thickness. - Reduced Shoulder and Back Involvement
The incline position stabilizes the torso, reducing the involvement of the shoulders and back. This setup keeps tension on the biceps throughout the movement and is ideal for anyone aiming to build stronger, bigger arms without engaging other muscle groups. - Helps Build the Bicep Peak
The lying incline curl emphasizes the long head of the bicep, which is responsible for creating the peak of the muscle. Regularly incorporating this exercise can help you achieve that well-rounded, defined bicep peak. - Improved Form and Control
With the incline position limiting movement, the lying incline curl encourages strict form and controlled movements, reducing the chances of swinging or cheating during the exercise.
How to Perform the Lying Incline Curl with a Barbell: Step-by-Step Guide
Follow these steps to master the lying incline curl with barbell and maximize your results:
1. Adjust the Bench
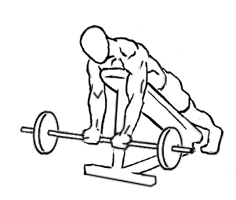
Start by adjusting an incline bench to a 45-degree angle. This angle ensures a proper range of motion for your arms while minimizing strain on the shoulders and elbows.
2. Position Yourself on the Bench
Lean face down on the incline bench, resting your chest and stomach on the padded support. Keep your feet on the floor with a firm stance to stabilize your body throughout the movement.
3. Grip the Barbell
Grasp a barbell with a shoulder-width grip, palms facing up. This grip width allows balanced activation of both the long and short heads of the biceps, providing a well-rounded workout for the upper arms.
4. Begin the Curl
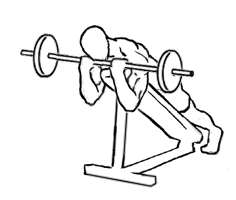
Allow your arms to hang down fully extended toward the floor. Exhale as you curl the barbell up towards your head, bending at the elbows. Focus on contracting your biceps as you lift, keeping your elbows close to your sides.
5. Squeeze at the Top
Once the barbell reaches the top of the movement, hold briefly to maximize the bicep contraction. This squeeze at the top enhances muscle engagement, contributing to better results over time.
6. Lower the Barbell in a Controlled Motion
Inhale as you slowly lower the barbell back to the starting position. Keep the movement steady and controlled to maintain tension on the biceps. Avoid letting your arms sway or using momentum to lift the weight.
Tips for an Effective Lying Incline Curl
- Maintain Steady Movements
Control is key with this exercise. Focus on slow, steady movements both on the way up and down. Avoid jerking or swinging the weight, as this can reduce muscle engagement and increase the risk of injury. - Engage Your Core for Stability
Even though you’re lying face down, engage your core muscles to provide additional stability. A stable torso allows you to fully concentrate on the biceps throughout the exercise. - Keep Elbows Fixed in Place
Ensure that your elbows remain stationary and close to your body. Moving the elbows forward or backward reduces the focus on the biceps and can turn this curl into more of a shoulder movement. - Choose an Appropriate Weight
Start with a lighter weight to master your form. A moderate weight that allows you to complete each rep with control is more effective than going heavy and sacrificing form. - Focus on the Squeeze at the Top
At the peak of each curl, hold the position for 1–2 seconds to maximize the bicep contraction. This small pause enhances muscle activation, leading to more pronounced results.
Common Mistakes to Avoid
- Using Excessive Weight
Heavy weights can compromise form, causing the body to rely on momentum rather than muscle strength. Begin with a lighter weight and only increase once you’re comfortable with the movement. - Swinging the Arms
Swinging your arms or allowing them to sway reduces the effectiveness of the curl. Keep your movements controlled and focus on isolating the biceps. - Allowing Elbows to Move
Letting the elbows drift forward or backward engages other muscle groups, reducing bicep activation. Keep your elbows close to your sides and stationary for the best results. - Not Extending Fully
To reap the full benefits of the lying incline curl, let your arms fully extend at the bottom of each rep. This full range of motion stretches the biceps and activates more muscle fibers. - Skipping the Squeeze
Skipping the squeeze at the top misses out on a crucial part of the movement. Holding the peak contraction for a second or two ensures maximum bicep engagement.
Variations of the Lying Incline Curl
Adding variations can keep your bicep workout challenging and effective. Here are some great options to try:
- Lying Incline Dumbbell Curl
Perform the exercise with dumbbells instead of a barbell. Using dumbbells allows each arm to work independently, which helps address muscle imbalances and increases stability demands. - Incline Hammer Curl
Use dumbbells with a neutral (hammer) grip, palms facing each other. This variation targets the brachialis—a muscle located underneath the biceps—for a more complete arm workout. - Incline Cable Curl
Position yourself on an incline bench with a low cable attachment. The cable provides constant tension throughout the movement, intensifying the exercise and increasing muscle engagement. - Single Arm Incline Curl
Perform the incline curl with one arm at a time. This approach allows you to focus on each bicep individually, correcting any muscle imbalances and increasing focus on the contraction. - Tempo Curl
Slow down each phase of the movement, especially the lowering (eccentric) phase. This increase in time under tension stimulates muscle growth and enhances muscle control.
Incorporating the Lying Incline Curl into Your Workout
The lying incline curl is versatile and can be integrated into your bicep or upper body routine in various ways. Here’s how to use it effectively:
- Strength Training Focus
For strength, perform 3–5 sets of 4–6 reps with a challenging weight. This low-rep range helps build power and strength in the biceps. - Hypertrophy (Muscle Growth)
To build muscle size, aim for 3–4 sets of 8–12 reps with moderate weight. This rep range is ideal for increasing muscle tension, leading to bigger, more defined biceps. - Endurance and Tone
For endurance and definition, perform 2–3 sets of 15–20 reps with a lighter weight. This high-rep approach builds muscle endurance and tones the arms. - Use as a Finisher
End your bicep workout with the lying incline curl for a final burnout. Aim for 2–3 sets of 12–15 reps to fully exhaust the biceps. - Pair with Other Bicep Exercises
Combine this exercise with other bicep movements like standing barbell curls, concentration curls, or preacher curls for a comprehensive arm workout.
Safety Tips for Performing the Lying Incline Curl
- Start Light
Begin with a light weight to get comfortable with the exercise and prevent straining the elbows and shoulders. Gradually increase the load as your form improves. - Engage Your Core
Keeping your core engaged adds stability to your upper body, allowing you to lift with better form and reducing the risk of lower back strain. - Avoid Over-Gripping
Holding the barbell too tightly can strain the wrists. Aim for a firm, yet relaxed grip that keeps tension on the biceps without discomfort in the wrists. - Focus on the Biceps
Make sure the biceps are doing all the work by keeping your shoulders down and relaxed. This isolation prevents other muscles from taking over. - Progress Gradually
Avoid adding too much weight too quickly. A steady, gradual increase allows for better muscle growth and reduces the risk of injury.
Frequently Asked Questions
Q1: Can beginners perform the lying incline curl?
A: Yes, this exercise is suitable for beginners who want to build strength in their biceps. Starting with a light weight and prioritizing form will help you get the hang of it.
Q2: How often should I include the lying incline curl in my workout?
A: Include this exercise in your bicep or upper body routine once or twice a week, allowing at least 48 hours of rest between sessions for optimal muscle recovery.
Q3: Is it necessary to use a barbell, or can I use dumbbells?
A: While a barbell offers a unified movement, dumbbells allow each arm to work independently, correcting muscle imbalances and providing a more natural range of motion. Both options are effective, so choose based on your comfort and preference.
Q4: Can this exercise replace standing curls?
A: The lying incline curl is a great addition to your routine but shouldn’t entirely replace traditional curls. Each type of curl targets the biceps slightly differently, so combining them provides a more comprehensive workout.
Q5: How does this exercise compare to preacher curls?
A: Both the lying incline curl and preacher curls limit body movement and isolate the biceps, but the incline curl places your arms in a more extended position, emphasizing the long head of the biceps. Including both can help ensure balanced development.
Advanced Tips for Maximizing Results from the Lying Incline Curl
- Slow Down the Eccentric Phase
Lowering the barbell slowly (3-4 seconds) during the eccentric phase increases time under tension, which is excellent for building muscle. The slower descent improves control and muscle activation. - Incorporate Pause Reps
Add a brief pause at the top of each curl—when your biceps are fully contracted. This pause boosts muscle engagement, challenging your biceps to hold the weight for longer and resulting in more effective muscle growth. - Utilize Drop Sets
Perform a set to failure, reduce the weight by about 20-30%, and continue to curl to failure again. Drop sets push your muscles to their limits, promoting growth by exhausting the biceps. - Vary Rep Ranges
Mix up your rep ranges to keep challenging your biceps. Alternate between heavy, low-rep sets and lighter, high-rep sets to avoid plateaus and continually stimulate the muscles. - Focus on the Mind-Muscle Connection
Concentrate on contracting your biceps during each curl. Visualizing your biceps working helps enhance the mind-muscle connection, improving activation and ultimately leading to better results.
Wrapping Up: Achieve Strong, Defined Biceps with the Lying Incline Curl
The lying incline curl with a barbell is an effective exercise for anyone serious about developing bigger, stronger biceps. By altering the angle of a traditional curl, this exercise enhances bicep isolation, maximizes muscle engagement, and helps build the much-desired bicep peak. It’s an excellent addition to your bicep workout, suitable for beginners and experienced lifters alike.
By focusing on form, starting with manageable weights, and incorporating variations, you can keep your biceps challenged and drive steady progress. The lying incline curl will help you reach your arm development goals, providing both strength and aesthetic benefits that enhance your overall fitness. Include this exercise in your routine and watch your biceps grow with each rep, bringing you closer to the sculpted arms you’re working toward.


