Last Updated on September 30, 2014
The Elevated Push-Up, also known as the Push-Ups with Feet Elevated, is a powerful upper-body exercise that builds strength, size, and endurance in the chest, shoulders, triceps, and core. This push-up variation involves placing your feet on an elevated surface, which shifts your body weight forward and emphasizes different parts of the chest, especially the upper chest. It’s a step up from the standard push-up, adding intensity, challenging stability, and allowing you to build a more defined and powerful upper body.
Whether you’re a beginner ready to add intensity to your push-ups or an experienced lifter looking for new ways to target your chest muscles, the Elevated Push-Up is a valuable addition to your workout routine. This guide covers everything from how to perform the Elevated Push-Up properly, the benefits it offers, muscles worked, common mistakes to avoid, variations, and ways to maximize results.
Benefits of the Push Ups with Feet Elevated
1. Increased Upper Chest Activation
The elevated position of your feet shifts the focus of the push-up toward the upper chest (pectoralis major, clavicular head) and shoulders. This variation is especially useful for those looking to develop the upper part of the chest, helping to create a more balanced, fuller appearance.
2. Greater Range of Motion
With your feet elevated, your body naturally moves through a greater range of motion, increasing muscle engagement and providing a deeper stretch at the bottom of the movement. This increased range helps promote muscle growth and strength development in the chest and shoulders.
3. Improved Shoulder and Core Stability
By adding height to your feet, you create an unstable environment that challenges the shoulders and core to stabilize your body. This exercise is great for building core strength, as your abs, obliques, and lower back must work harder to maintain proper form.
4. Versatile for All Fitness Levels
While Elevated Push-Ups are more challenging than standard push-ups, they can still be modified to suit various fitness levels. Beginners can start with a lower elevation, while advanced athletes can increase the height of their feet or add weight for a greater challenge.
5. Minimal Equipment Needed
All you need to perform an Elevated Push-Up is a sturdy surface like a bench, box, or step. This makes it a convenient exercise you can do anywhere—at the gym, at home, or even outdoors—making it perfect for bodyweight training enthusiasts.
Muscles Worked in the Elevated Push-Up
- Pectoralis Major (Chest): The main chest muscle, particularly the upper portion, is the primary focus in this exercise, providing strength and shape to the chest.
- Deltoids (Shoulders): The anterior (front) deltoids are heavily engaged to stabilize and lift your body, adding shoulder strength and endurance.
- Triceps Brachii (Back of Arms): The triceps are responsible for extending the elbows during the push-up, contributing to arm strength and definition.
- Core Muscles: The abdominals, obliques, and lower back work to maintain a straight body line and prevent sagging, improving core stability and control.
- Serratus Anterior: Located along the ribcage, the serratus anterior helps with scapular stability and mobility, which is essential for shoulder health and power during pressing movements.
Step-by-Step Guide to Performing the Push Ups with Feet Elevated
Step 1: Choose the Right Elevation
Select a bench, box, or step that’s about 18 inches off the ground. Beginners might start with a lower elevation (12 inches), while more advanced lifters can go up to 24 inches for added difficulty.
Step 2: Position Your Feet
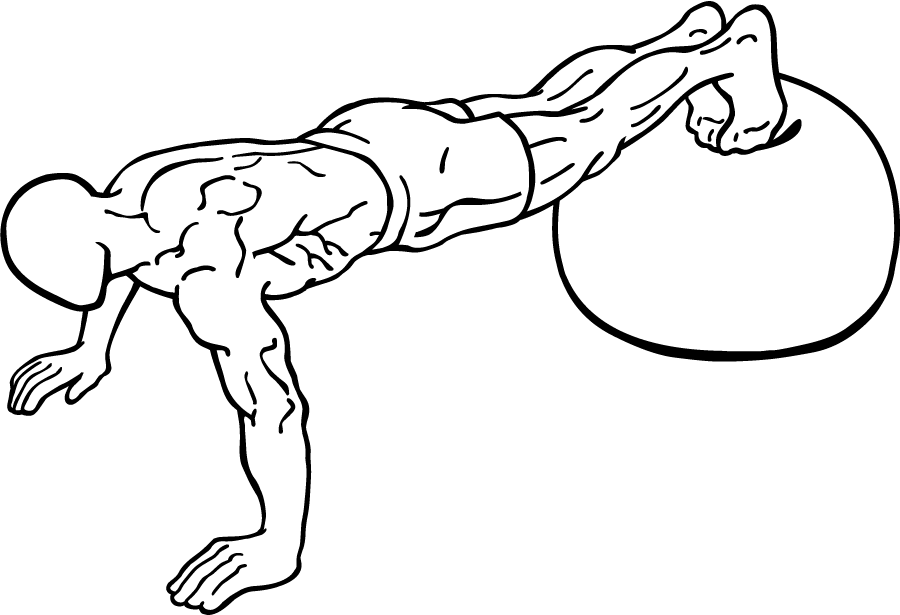
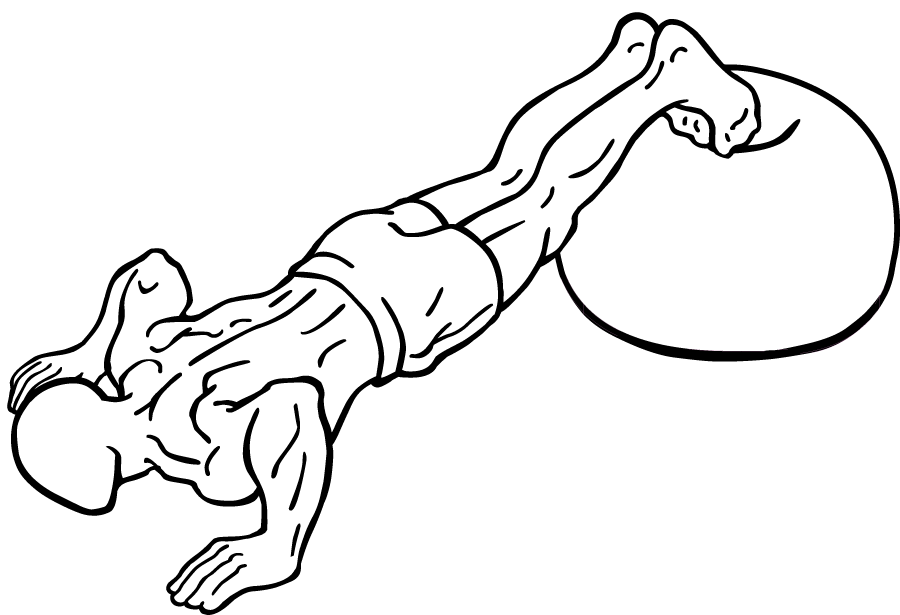
Place the tops of your feet on the bench so they’re flat against it. Your body should be at a slight downward angle, with your feet securely positioned to avoid slipping.
Step 3: Set Your Hand Placement
Position your hands on the floor slightly wider than shoulder-width apart, with your fingers pointing forward. Your hands should be directly below your shoulders, helping you maintain alignment.
Step 4: Engage Your Core
Tighten your core muscles to keep your body in a straight line from head to heels. Your back should remain flat throughout the movement, with no arching or sagging in the lower back. Look slightly forward to help keep your neck aligned.
Step 5: Lower Your Body
Inhale as you bend your elbows and lower your chest toward the floor in a slow, controlled manner. Keep your elbows at about a 45-degree angle to your body. Lower yourself until your chest nearly touches the floor or until you feel a comfortable stretch in your chest muscles.
Step 6: Push Back Up
Exhale as you press through your palms and extend your elbows, pushing your body back up to the starting position. Squeeze your chest and triceps at the top of the movement, maintaining control.
Tip: Maintain a slow and controlled pace, focusing on form rather than speed to get the most out of each repetition.
Common Mistakes to Avoid
- Arching or Sagging the Lower Back
- Many people allow their lower back to sag due to a lack of core engagement. Tighten your abs and keep your body in a straight line from head to heels to avoid this.
- Flaring the Elbows
- Flaring your elbows out to the sides places undue stress on your shoulders. Keep your elbows at a 45-degree angle to your torso to protect your shoulders and maximize chest engagement.
- Letting the Head Drop
- Dropping your head forward can cause neck strain and disrupt alignment. Keep your head aligned with your spine, and gaze slightly forward to maintain good posture.
- Using Momentum
- Using momentum or bouncing up and down reduces the effectiveness of the exercise. Focus on a slow, controlled movement, especially when lowering yourself down to maximize muscle activation.
- Placing Hands Too Far Forward or Back
- Placing your hands too far in front or behind your shoulders can strain the wrists and shoulders. Ensure your hands are directly beneath your shoulders for proper alignment and support.
Variations of the Push Ups with Feet Elevated
1. Single-Leg Elevated Push-Up
Lift one leg off the bench and perform the push-up. This adds an element of instability, increasing core engagement and challenge for the supporting arm and shoulder.
2. Elevated Pike Push-Up
With your feet on the bench, walk your hands closer to the bench, creating a pike position (hips raised). This variation targets the shoulders and upper chest more intensely.
3. Weighted Elevated Push-Up
For added resistance, place a weighted plate or sandbag on your upper back. This variation increases the load on your chest and triceps, promoting strength and muscle gains.
4. Decline Spiderman Push-Up
Perform a standard elevated push-up, but as you lower yourself, bring one knee toward the elbow on the same side. Alternate legs with each rep to challenge your core and hip mobility.
5. Hand-Release Elevated Push-Up
At the bottom of the push-up, briefly lift your hands off the ground before pushing back up. This variation increases the range of motion and forces you to work harder during the pressing phase.
How to Incorporate Push Ups with Feet Elevated into Your Workout
The Push Ups with Feet Elevated is a versatile exercise that can be included in a variety of routines, whether you’re focusing on chest, upper body, or full-body strength. Here’s a sample upper body workout incorporating elevated push-ups for optimal chest and shoulder development:
Sample Upper Body Workout with Elevated Push-Ups
1. Elevated Push-Up
- Sets: 3 | Reps: 10-12
2. Dumbbell Bench Press
- Sets: 3 | Reps: 10-12
3. Dumbbell Shoulder Press
- Sets: 3 | Reps: 10-12
4. Tricep Dips
- Sets: 3 | Reps: 12-15
5. Cable Flyes (High to Low)
- Sets: 3 | Reps: 12-15
6. Core Finisher – Plank
- Sets: 3 | Time: 30-45 seconds
Cool-Down: Stretch your chest, shoulders, triceps, and core to prevent muscle tightness and improve flexibility.
Tips for Maximizing Your Results with Push Ups with Feet Elevated
1. Focus on Time Under Tension
Slowing down your reps increases the time your muscles are under tension, promoting muscle growth and endurance. Try pausing at the bottom of the push-up for an extra second to make each rep more challenging.
2. Keep Your Core Tight
A tight core keeps your body in a straight line and prevents your lower back from sagging. Imagine pulling your belly button toward your spine throughout each rep to maintain a strong, stable position.
3. Add Progressive Overload
Increase the intensity over time by elevating your feet higher, adding weight, or increasing the number of reps or sets. Progressive overload is key for continued strength gains and muscle development.
4. Use Proper Breathing Technique
Inhale as you lower yourself down, and exhale as you push back up. Proper breathing helps stabilize your body and provides more control over the movement.
5. Watch Your Form in a Mirror
If possible, use a mirror or record yourself to monitor your form. This can help you ensure your body remains aligned and that you’re not making any common form errors, like letting your hips sag.
Frequently Asked Questions
1. How high should my feet be for Elevated Push-Ups?
An elevation of 18-24 inches is generally recommended. Beginners may start with a lower surface, around 12 inches, while advanced lifters can go up to 24 inches or more for added difficulty.
2. Can I do Elevated Push-Ups every day?
While you can perform Elevated Push-Ups frequently, it’s best to give your muscles time to recover. Two to three times per week with rest days in between is usually sufficient.
3. Are Elevated Push-Ups safe for beginners?
Yes, Elevated Push-Ups are safe for beginners if they start with a lower elevation and focus on proper form. Over time, you can increase the height as you gain strength.
4. Can I use Elevated Push-Ups to replace bench press in my workout?
While Elevated Push-Ups are effective, they work differently from the bench press and are bodyweight-based. They can complement the bench press but may not replace it entirely, especially if your goal is to lift heavy weights.
5. How do I know if I’m ready for Elevated Push-Ups?
If you can perform standard push-ups with good form and are ready for an additional challenge, you’re likely ready to try Elevated Push-Ups. Start with a lower elevation and focus on maintaining control.
Push Ups with Feet Elevated are an excellent bodyweight exercise to enhance upper chest, shoulder, tricep, and core strength. They add an extra challenge to standard push-ups by increasing range of motion, focusing on the upper chest, and demanding greater stability. By incorporating Elevated Push-Ups into your workout routine, you’ll develop a more defined chest, stronger shoulders, and a rock-solid core.
Remember, form and control are key with Elevated Push-Ups. Start with a manageable elevation, focus on perfecting your form, and progress over time by increasing the height or adding weight. Whether you’re a beginner aiming to build strength or an experienced athlete seeking a new challenge, Elevated Push-Ups can provide the upper body and core benefits you’re looking for.
With consistency, practice, and dedication, you’ll see noticeable improvements in strength and muscle tone. So go ahead, give Elevated Push-Ups a try, and watch your upper body strength soar!


