Last Updated on September 25, 2014
Quick alternating bicep curls with resistance bands, often called “bungy curls,” are a fantastic exercise to add to your fitness routine. They effectively isolate the biceps, promote muscular endurance, and can be done virtually anywhere due to the portability of resistance bands. Unlike traditional dumbbell curls, resistance bands create constant tension throughout the movement, adding a unique challenge to your muscles. This exercise is accessible to people of all fitness levels, whether you’re just starting or already experienced with resistance training.
In this guide, we’ll break down the steps, benefits, muscle groups targeted, technique tips, and variations to keep things interesting and progressively challenging.
Benefits of Quick Alternating Bicep Curls with Resistance Bands
- Improved Bicep Strength and Definition: Resistance band curls primarily target the bicep muscles, helping to build strength, tone, and shape in your arms. This is ideal for achieving well-defined biceps.
- Increased Muscular Endurance: Due to the continuous resistance, band curls enhance muscle endurance, allowing you to perform more repetitions before fatigue sets in.
- Joint-Friendly Exercise: Compared to weights, resistance bands provide a more gentle pull on your joints, especially the elbows and wrists, making this exercise joint-friendly and suitable for people recovering from injuries.
- Portable and Cost-Effective: Bands are inexpensive and highly portable, making them a practical choice for those who want to work out on the go or at home.
- Versatile Resistance Levels: Bands come in various resistance levels, so you can progressively increase the challenge without needing a range of dumbbells.
Step-by-Step Guide to Quick Alternating Bicep Curls with Resistance Bands
To get the most out of this exercise, follow these steps carefully:
Step 1: Set Up Your Band
Choose a band with the appropriate resistance for your current strength level. A lighter band is usually best for beginners, while intermediate and advanced individuals may opt for a medium or heavy band.
Step 2: Position the Band
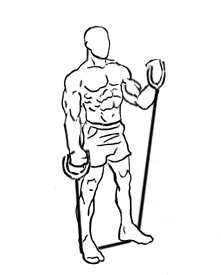
- Stand on the Band: Place the middle section of the band securely under your feet. Your feet should be about shoulder-width apart to ensure the band stays in place.
- Grip the Handles: Grasp the handles or ends of the band with your palms facing forward, positioning your hands near your thighs. Ensure there’s some tension in the band even before you begin to curl, which will keep your muscles engaged from the start.
Step 3: Prepare Your Stance
- Stand Tall: Keep your feet shoulder-width apart, knees slightly bent for stability, and chest up.
- Engage Your Core: Draw your abdominal muscles in to stabilize your torso and support your spine during the movement.
- Shoulders Back: Relax your shoulders and keep them pulled slightly back and down. This helps maintain good posture throughout the exercise.
Step 4: Start the Curl Motion
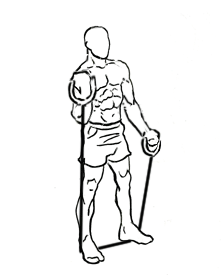
- Alternate Arms: Begin by curling your right arm up towards your shoulder, keeping your wrist neutral (not bending). Once your right arm reaches the top of the movement, start curling the left arm up while lowering the right.
- Focus on the Bicep Contraction: As you curl each arm, squeeze or “contract” your bicep muscle at the top of the movement. This helps maximize engagement.
- Controlled Speed: Initially, perform each curl in a slow and controlled manner to feel the resistance and ensure proper form. As you become comfortable, you can increase the speed slightly, but always maintain control.
Step 5: Increase the Speed (Advanced Option)
Once you have mastered the controlled motion, you can add a “quick” tempo to the exercise by increasing the pace of your curls. The increased speed will challenge your muscular endurance and cardiovascular system, creating a quick “burnout” effect for the biceps.
Step 6: Keep Good Form
- Avoid Momentum: Resist the urge to swing your arms or use your back to help lift the band. The goal is to isolate the biceps, so keep your torso stable.
- Focus on Range of Motion: Curl each arm fully but without locking the elbows at the bottom. This maintains continuous tension on the biceps, enhancing muscle activation.
Step 7: Repeat for Desired Repetitions
Aim to perform 12-15 repetitions on each arm for 2-3 sets. You can increase the number of repetitions or sets as you get stronger.
Tips for Proper Form and Safety
- Breath Control: Exhale as you curl your arm up, and inhale as you lower it. Proper breathing helps maintain energy and reduces fatigue.
- Elbow Position: Keep your elbows close to your torso throughout the exercise to prevent unnecessary strain on the shoulder and to keep the bicep as the main mover.
- Avoid Over-Bending Wrists: Wrists should stay in a neutral position throughout to avoid straining them.
- Use Appropriate Resistance: Start with a lighter band and gradually work your way up to higher resistance to avoid injury.
- Stop if You Feel Pain: Minor muscle burn is okay, but if you feel joint or ligament pain, stop and reassess your form.
Muscles Targeted
- Biceps Brachii: The main muscle being worked here, the biceps brachii, is responsible for the curling motion of the arm.
- Brachialis: Located underneath the biceps brachii, the brachialis is heavily activated during this exercise, giving your arm a fuller appearance.
- Forearms: Stabilizing the grip and controlling the band helps engage the forearm muscles, providing an ancillary benefit.
- Core Muscles: While not directly targeted, keeping your core tight and stable supports balance and posture.
Variations to Challenge Yourself
- Double Arm Curl with Band: Instead of alternating, curl both arms at the same time. This increases the challenge as your core works harder to stabilize.
- Slow Negatives: Curl up at normal speed but lower each arm very slowly. This emphasizes the eccentric (lowering) phase, which is highly effective for building muscle.
- Paused Curls: Hold the curl at the top of the movement for 2-3 seconds before lowering. The pause forces your muscles to work harder and can help improve muscle control and endurance.
- Single-Leg Stand: Increase the difficulty by standing on one leg. This adds a balance component, engaging more of your stabilizing muscles, especially the core.
- Half-Reps at the Top: Perform a full curl, then do half reps only in the top half of the range of motion before lowering. This is great for adding extra tension and targeting the biceps peak.
Common Mistakes to Avoid
- Swinging the Body: Swinging your body or using momentum reduces the effectiveness of the exercise by taking tension off the biceps. Focus on using muscle strength, not momentum.
- Incorrect Band Tension: Using a band that’s too tight or too loose can hinder form. Ensure there’s some initial tension in the band before you start curling.
- Locking Out the Elbows: Avoid locking out your elbows at the bottom of each rep, as this can strain the joint and reduce tension on the biceps.
- Overly Fast Reps: While increasing speed is part of the advanced variation, avoid rushing through the movement. Maintain control to maximize the muscle engagement.
How to Integrate Quick Alternating Bicep Curls with Resistance Bands into Your Routine
- As a Warm-Up: This exercise is excellent for warming up your arms and getting blood flow to the biceps.
- Within a Superset: Pair it with a tricep exercise, like overhead tricep extensions, to create an arm-focused superset that maximizes upper-arm work.
- End of Workout Finisher: Use this exercise at the end of your workout to “burn out” the biceps with high reps and lighter resistance.
- Within Circuit Training: Add it to a full-body circuit for a quick and efficient way to target your arms along with other muscle groups.
Sample Workout Routine Including Quick Alternating Bicep Curls with Resistance Bands
1. Full-Body Circuit with Resistance Band Focus
- Squats with Band: 15 reps
- Quick Alternating Bicep Curls with Band: 15 reps each arm
- Band Chest Press: 12 reps
- Band Rows: 12 reps each side
- Overhead Shoulder Press with Band: 12 reps
Perform each exercise back-to-back with minimal rest. Rest for 1-2 minutes after completing the circuit. Repeat for 3-4 rounds.
2. Arm Day Routine
- Quick Alternating Bicep Curls with Band: 15 reps each arm
- Overhead Triceps Extension with Band: 15 reps
- Hammer Curls with Dumbbell: 12 reps each arm
- Tricep Pushdown with Band: 15 reps
Rest for 30-60 seconds between exercises. Complete 3 sets.
Closing Thoughts
Quick alternating bicep curls with a resistance bands provide an effective way to build bicep strength, improve endurance, and enhance arm aesthetics. They’re accessible, portable, and versatile, making them an excellent choice for anyone wanting to train their arms at home or on the go.
Adding this exercise to your routine can help you achieve stronger, more toned biceps and contribute to overall upper-body fitness.


