Last Updated on September 25, 2014
The Rear Deltoid Row with a barbell is a highly effective exercise for building strength and definition in the rear shoulders (rear deltoids) and upper back. It also engages the biceps as a secondary muscle group, making it a fantastic compound exercise for your upper body. By pulling the barbell in a controlled manner, this exercise isolates the often-undertrained rear delts, an area critical for shoulder health, posture, and a balanced, well-rounded physique.
In this guide, we’ll dive deep into the benefits of the Rear Deltoid Row, its correct technique, tips to avoid common mistakes, variations for all fitness levels, and advice on incorporating it into your workout routine. Whether you’re a beginner or advanced lifter, understanding and mastering this exercise can take your upper body strength and stability to new heights.
Why Do the Rear Deltoid Row?
- Builds Strong, Defined Shoulders: The rear deltoid row directly targets the rear part of the shoulder, giving it strength, size, and definition.
- Improves Posture: Strengthening the rear deltoids and upper back muscles helps prevent the common issue of rounded shoulders caused by a forward-leaning posture. This improves your overall posture.
- Enhances Upper Back Stability: This exercise targets the upper back, helping improve stability and strength in that area, which is vital for other movements and sports activities.
- Boosts Overall Shoulder Health: Balanced shoulder training supports joint health and reduces the risk of shoulder injuries, especially for people who work out regularly or play sports.
- Engages the Biceps: The biceps are engaged during this pulling movement, so you’re also working on arm strength, making it a time-efficient choice.
Muscles Worked
The Rear Deltoid Row primarily targets:
- Rear Deltoids: The back of the shoulder, responsible for pulling the arms back and maintaining shoulder stability.
- Upper Trapezius: A large muscle in the upper back, playing a crucial role in supporting the shoulders and neck.
- Rhomboids: Located between the shoulder blades, these muscles pull the shoulders back and help with posture.
- Biceps: The upper arm muscles involved in pulling movements, contributing to the lift.
- Latissimus Dorsi: Although not the main focus, the lat muscles assist in stabilizing and supporting the movement.
Proper Technique for the Rear Deltoid Row with Barbell
To get the most out of this exercise, here is a detailed, step-by-step breakdown:
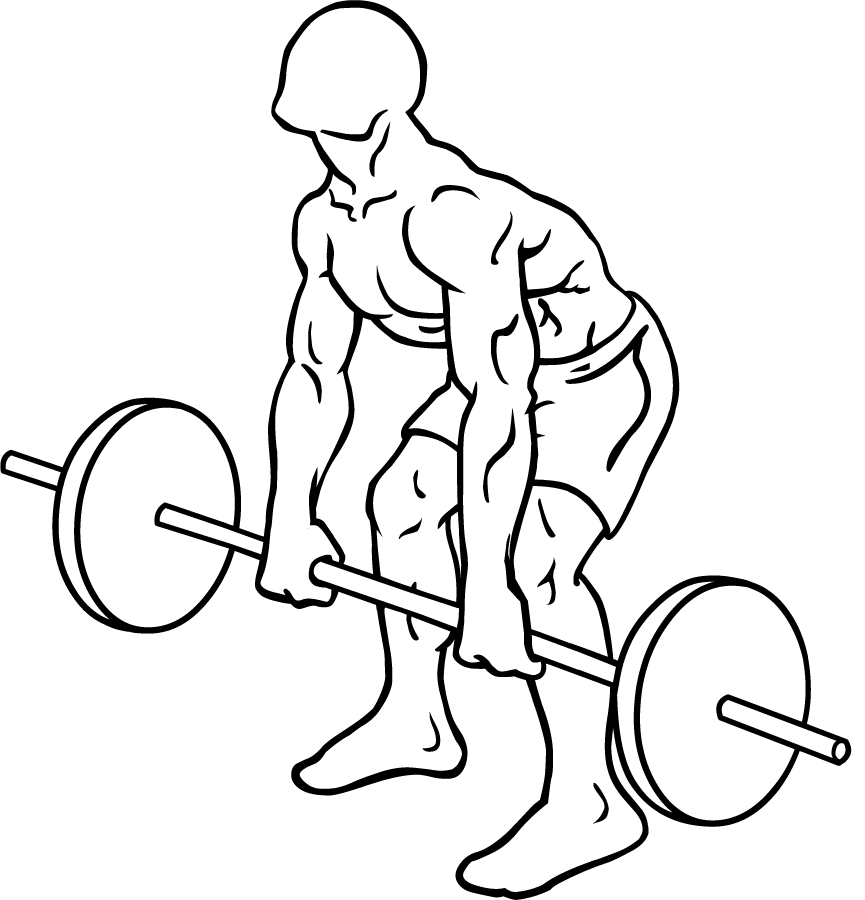
Step 1: Set Up the Barbell
- Choose the Right Weight: Start with a manageable weight, especially if you’re new to this movement. You can always add more as you get comfortable with the form.
- Place the Barbell on the Floor: Make sure the barbell has weight plates that are stable on the floor and won’t roll around.
Step 2: Position Your Feet and Knees
- Feet Shoulder-Width Apart: Stand with your feet shoulder-width apart to provide a strong, stable base.
- Bend Your Knees Slightly: This bend helps you maintain a balanced stance, so your lower back doesn’t bear unnecessary stress.
Step 3: Grip the Barbell
- Wide Overhand Grip: Grasp the bar with an overhand grip (palms facing downward) wider than shoulder-width apart. This wide grip emphasizes the rear deltoids more effectively than a narrow grip.
- Firm Grip: Make sure your grip is firm but relaxed enough to avoid unnecessary tension in your forearms.
Step 4: Set Your Stance and Posture
- Back Straight: Keep your back straight, with a slight arch in your lower back to maintain a neutral spine.
- Lean Forward: Bend slightly at the hips, creating about a 45-degree angle between your torso and the floor. Your chest should stay lifted, and your head aligned with your spine, not looking up or down.
- Shoulders Back: Retract your shoulder blades slightly to engage your upper back muscles and avoid rounding your shoulders forward.
Step 5: Execute the Rowing Motion
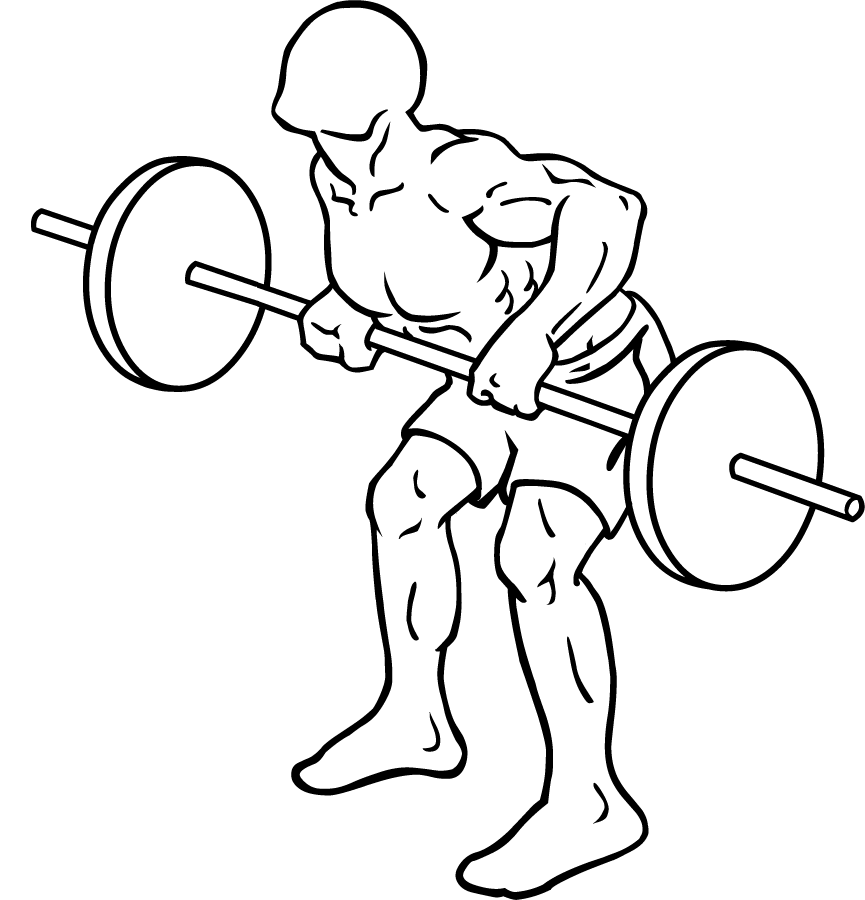
- Pull the Barbell Upwards: Engage your rear deltoids, upper back, and biceps to pull the barbell up toward your chest. Aim to pull the bar as high as you can without compromising form.
- Elbows Wide: Keep your elbows pointed out and slightly behind you. This arm position puts maximum tension on the rear deltoids, rhomboids, and upper back muscles.
- Contract the Rear Deltoids: At the top of the motion, focus on squeezing your rear delts and upper back muscles.
Step 6: Hold the Position
- Pause at the Top: Once the barbell reaches close to your chest, hold the position briefly (1-2 seconds) to intensify the muscle contraction.
- Feel the Contraction: Make sure you’re feeling the squeeze in your shoulders and upper back rather than your lower back.
Step 7: Lower the Barbell
- Controlled Descent: Slowly lower the barbell back down to the starting position. Avoid dropping it quickly to maintain control and tension in your muscles.
- Repeat the Movement: Complete 10-15 reps, depending on your fitness level and training goals.
Common Mistakes and How to Avoid Them
- Rounded Back: Rounding your back can lead to poor posture and increase the risk of injury. Maintain a straight back with a slight arch in your lower back.
- Using Too Much Weight: Too much weight can make it hard to maintain proper form, putting excess strain on your lower back and shoulders. Start with a manageable weight and progress gradually.
- Pulling with the Arms: Avoid pulling solely with your arms; focus on engaging your rear deltoids and upper back to do most of the work.
- Elbows Tucked: Tucking your elbows limits rear deltoid activation. Instead, keep them wide to target the correct muscles effectively.
- Fast Movements: Performing the exercise too quickly reduces tension and control. Aim for a slow and controlled motion on both the upward and downward phases.
Tips for Success
- Focus on the Mind-Muscle Connection: Consciously engaging the rear deltoids and upper back muscles can improve the effectiveness of this exercise. Visualize the muscles contracting with each rep.
- Don’t Overextend: When lifting the barbell, avoid jerking it up higher than your chest level, as overextending can strain your shoulder joints.
- Use a Mirror: If possible, perform this exercise in front of a mirror to monitor your form and ensure your back remains straight.
- Wear a Weightlifting Belt (if needed): For added support, especially with heavier weights, consider using a weightlifting belt to support your lower back.
- Stay Consistent: Regular practice is key to seeing progress in both strength and muscle development.
Variations to Keep Things Interesting
- Dumbbell Rear Deltoid Row: Instead of a barbell, use dumbbells. This allows for a greater range of motion and requires each arm to work independently, improving balance and symmetry.
- Cable Rear Deltoid Row: Use a cable machine set at a low position. The cable provides constant tension, which can be beneficial for muscle activation throughout the entire range of motion.
- Smith Machine Rear Deltoid Row: The Smith machine provides additional stability, making it easier to focus on the rear deltoid and upper back muscles.
- Underhand Grip Variation: Using an underhand (supinated) grip shifts some focus to the biceps and can give the exercise a slightly different feel.
- Single-Arm Dumbbell Row: Perform the exercise with one arm at a time using a dumbbell. This allows you to isolate each side individually and can help improve muscle imbalances.
- Resistance Band Rear Deltoid Row: For a lower-impact option, try using resistance bands. They provide a gentler pull, ideal for people with joint sensitivity.
Integrating Rear Deltoid Rows into Your Workout Routine
- In Shoulder Workouts: Include this exercise in your shoulder workout routine alongside other deltoid exercises like lateral raises and overhead presses.
- As Part of a Pull Day: Since this exercise is a pulling movement, it works well on a “pull day” where you might also perform exercises for your back and biceps, such as pull-ups, rows, and curls.
- In a Full-Body Circuit: Include it as one of the upper body exercises in a full-body workout circuit for balanced muscle training.
- For Posture Training: Rear deltoid rows are effective for people aiming to improve posture. Including them regularly can help correct rounded shoulders and strengthen postural muscles.
Sample Workout Routines Including Rear Deltoid Row
1. Shoulder and Upper Back Routine
- Overhead Dumbbell Press: 3 sets of 10 reps
- Lateral Raises: 3 sets of 12 reps
- Rear Deltoid Row (Barbell): 3 sets of 12 reps
- Face Pulls (Cable): 3 sets of 12 reps
- Shrugs (Dumbbell): 3 sets of 10 reps
2. Full-Body Circuit
- Squats: 3 sets of 15 reps
- Push-Ups: 3 sets of 12 reps
- Rear Deltoid Row (Barbell): 3 sets of 12 reps
- Lat Pulldowns (Cable): 3 sets of 12 reps
- Plank: 3 sets, hold for 30 seconds
Advanced Tips and Techniques
- Tempo Control: Try slowing down the lowering phase (eccentric portion) of the movement. This keeps the muscles under tension longer and can boost muscle growth.
- Drop Sets: For an advanced technique, start with a heavier weight and perform as many reps as possible, then drop to a lighter weight and continue without resting. This is known as a “drop set” and increases workout intensity.
- Supersets with Chest Exercises: Pair rear deltoid rows with a chest exercise like push-ups or bench presses in a superset to work opposing muscle groups.
- Isometric Hold: At the top of the movement, hold the position for 3-5 seconds to intensify the contraction. This can help build endurance in the rear deltoids.
How Many Reps and Sets?
For strength and muscle growth, aim for 3-4 sets of 8-12 reps with a moderate to heavy weight. If you’re targeting muscular endurance, you can do 15-20 reps with a lighter weight.
Final Thoughts
The Rear Deltoid Row with a barbell is a versatile, effective exercise for anyone looking to build upper body strength, improve posture, and add definition to their shoulders and back. By incorporating it into your regular workout routine, focusing on proper form, and using appropriate weights, you’ll see substantial improvements in shoulder strength and stability.
Remember, consistency is key. Stick with it, challenge yourself with progressive variations, and you’ll enjoy the benefits of a strong, balanced upper body for years to come.


