Last Updated on September 26, 2014
The Seated Shoulder Press Machine is a staple exercise for building shoulder strength, stability, and mass. Unlike free-weight presses, the machine version allows for a more controlled movement pattern, making it ideal for both beginners and advanced lifters who want to target the shoulder muscles safely and effectively.
This in-depth guide covers the benefits of using the seated shoulder press machine, a step-by-step breakdown of the exercise, tips for perfecting your form, common mistakes to avoid, and advanced variations to keep your shoulder workouts challenging and engaging.
Benefits of the Seated Shoulder Press Machine
- Focuses on Shoulder Muscle Development: This exercise primarily targets the deltoids, particularly the anterior and medial heads, resulting in well-rounded shoulder development.
- Promotes Controlled Motion: Since the machine guides your movement path, it minimizes the risk of injury and lets you focus on engaging the right muscles without worrying about balance.
- Ideal for Beginners and Injury Prevention: The seated shoulder press machine is great for beginners and those with previous shoulder injuries because it offers stability and reduces strain on supporting muscles.
- Supports Strength and Muscle Gains: Regularly performing the shoulder press machine exercise builds strength, contributing to improved performance in other upper body movements.
- Improves Overhead Press Strength: Mastering the shoulder press machine helps build a foundation for advanced overhead pressing exercises using free weights.
Step-by-Step Guide to Performing the Seated Shoulder Press Machine Exercise
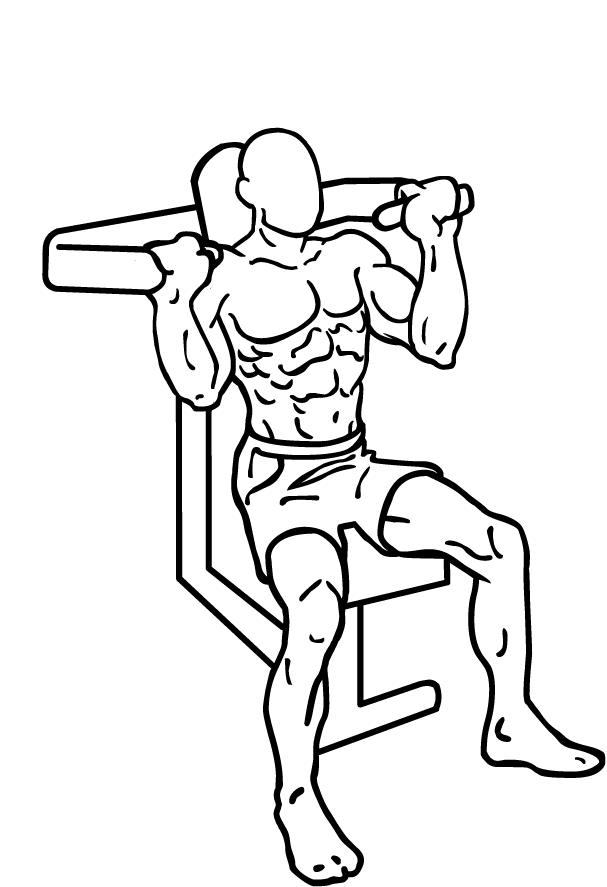
Step 1: Adjust the Machine
- Seat Position: Begin by adjusting the seat so that the handles are at shoulder height. This alignment is crucial for keeping the focus on your shoulder muscles and minimizing strain on your joints.
- Back Support: Sit with your back firmly against the back pad, keeping your feet flat on the ground. Good posture is essential for isolating the shoulders effectively.
Step 2: Grip the Handles
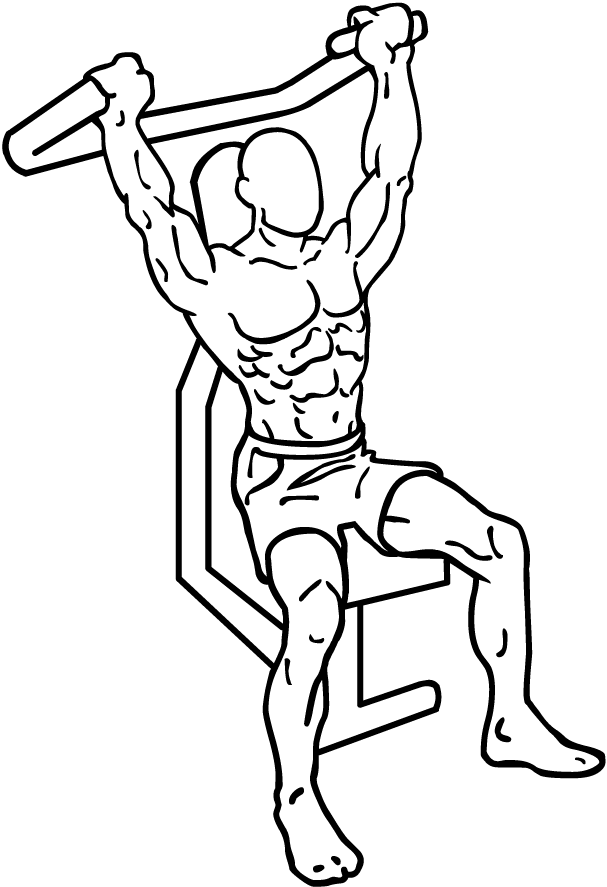
- Hand Placement: Grasp the handles with an overhand grip. Your palms should be facing forward, and your hands should be shoulder-width apart or slightly wider.
- Core Engagement: Draw your abs in, which stabilizes your torso and reduces strain on your lower back during the exercise.
Step 3: Pressing Upward
- Smooth, Controlled Movement: Begin the press by extending your arms upward, pushing the handles toward the ceiling. Avoid fully locking out your elbows to maintain tension on the shoulder muscles.
- Pause at the Top: When your arms are fully extended (without locking out), pause briefly. This slight hold maximizes muscle engagement and prepares you for the controlled descent.
Step 4: Lowering Back Down
- Controlled Descent: Slowly lower the handles back down to the starting position, focusing on maintaining tension in your shoulders throughout the movement. Aim for a controlled movement rather than letting the weight drop.
- Range of Motion: Lower the handles until they’re just above shoulder level, maintaining constant tension on the deltoids.
Step 5: Repeat
- Repetition and Sets: Aim for 3-4 sets of 8-12 repetitions, depending on your fitness level and training goals. If you’re focusing on endurance, aim for slightly higher reps (12-15), while strength-focused sessions might have lower reps (6-8) with more weight.
Tips for Maximizing Shoulder Activation
- Check Your Alignment: Before beginning, make sure that the handles are in line with your shoulders. Improper seat height can lead to discomfort or strain on your neck and upper back.
- Avoid Overarching Your Back: Press your back firmly against the seat to prevent arching, which can place unnecessary stress on the lower back.
- Slow, Controlled Movements: For best results, use a controlled motion both upward and downward. Quick reps reduce muscle engagement and risk using momentum.
- Experiment with Grip Width: A slightly wider grip can put more emphasis on the lateral deltoids, while a narrower grip might engage the front deltoids more.
Common Mistakes to Avoid
- Locking Out Elbows: Avoid locking your elbows at the top of the press. Locking out shifts the tension from your shoulders to your joints and reduces the effectiveness of the exercise.
- Using Too Much Weight: While it may be tempting to go heavy, using excessive weight can compromise form. Start with a manageable weight and increase gradually.
- Shrugging Shoulders: Shrugging or lifting your shoulders as you press up puts strain on your neck and traps rather than isolating the deltoids.
- Arching the Lower Back: Maintain a neutral spine by pressing your back against the seat and engaging your core to prevent excessive arching.
Advanced Tips and Variations
- Pause at the Bottom: Adding a slight pause at the bottom of each rep increases the time under tension and challenges the shoulder muscles further.
- Slow Eccentric Phase: Focus on a slow lowering (eccentric) phase to maximize muscle engagement and promote better gains.
- Single-Arm Shoulder Press: By pressing with one arm at a time, you engage your core more actively and can better address muscle imbalances.
Variations of the Seated Shoulder Press Machine
1. Alternating Shoulder Press Machine
- Alternate pressing each arm independently, which adds a core stability element to the exercise. This variation allows you to focus on each shoulder individually, helping to correct imbalances.
2. Standing Shoulder Press Machine
- Some machines allow for a standing position, which engages more core stability and mimics a free-weight overhead press.
3. Neutral Grip Shoulder Press
- Adjust your grip so that your palms are facing each other (a neutral grip). This variation shifts some of the load away from the front delts, making it more comfortable for those with shoulder issues.
Muscle Anatomy and Mechanics: Why the Seated Shoulder Press Machine Works
The primary muscles worked during the shoulder press machine exercise are the deltoids, which are divided into three heads: anterior (front), medial (side), and posterior (rear). While this exercise emphasizes the anterior and medial heads, it also engages the trapezius and triceps as stabilizers.
The shoulder press machine’s fixed path reduces the recruitment of stabilizing muscles compared to free weights, which is why it’s beneficial for isolating the deltoids. By mastering the machine press, you can then progress to more challenging overhead press exercises with a solid foundation.
Integrating the Seated Shoulder Press into Your Routine
- As Part of a Shoulder Workout: Include the shoulder press machine early in your shoulder routine for focused strength work, followed by lighter exercises for detail and definition.
- In Upper Body or Push Workouts: For balanced upper-body training, pair the shoulder press with chest and tricep exercises to create a comprehensive push-focused session.
- Pre-Exhaust Technique: Use it to pre-exhaust the shoulders before moving on to compound lifts like barbell or dumbbell presses, which can maximize shoulder engagement.
How to Progress with the Seated Shoulder Press Machine
Beginners
- Start with a lighter weight and focus on mastering the motion. Aim for 2-3 sets of 10-15 reps.
Intermediate
- Gradually increase the weight and experiment with different grips or rep schemes, such as pyramid sets (increasing weight as reps decrease) or supersets with other shoulder exercises.
Advanced
- For advanced lifters, try drop sets, where you perform a set to near-failure, reduce the weight, and immediately continue. This technique pushes the shoulders to fatigue and maximizes hypertrophy.
Frequently Asked Questions
1. Should I use the shoulder press machine or free weights?
- Both have their benefits. The machine offers stability and controlled movement, ideal for beginners or isolating the shoulders. Free weights engage more stabilizers and may be more challenging for advanced lifters.
2. Is the shoulder press machine safe for those with shoulder injuries?
- Generally, the machine press is safer due to the controlled path. However, those with shoulder injuries should consult a professional before starting any pressing movements.
3. How often should I use the shoulder press machine in my routine?
- For most, 1-2 times per week is sufficient. If shoulder strength or size is a major goal, consider incorporating it twice a week with varying intensity.
Shoulder Press Machine vs. Dumbbell Shoulder Press: What’s the Difference?
While both exercises target the deltoids, the machine provides a fixed range of motion, ensuring consistent form and targeting the shoulders without requiring balance or stability from other muscles. This is ideal for those focused on isolating the deltoids or anyone new to overhead pressing.
The dumbbell shoulder press, on the other hand, involves more stabilizing muscles, engages the core more, and allows for a more natural range of motion. Both exercises are valuable, and alternating between them can provide a balanced shoulder workout.
The Role of Core Engagement in Shoulder Press Movements
Although this is primarily a shoulder exercise, the core plays a significant role in maintaining stability and form. Drawing in the abs and maintaining a strong torso helps prevent excessive arching of the back, which can lead to lower back strain. Strengthening your core along with your shoulders ensures a safer, more effective workout.
Safety Tips
- Adjust the Machine: Ensure the seat is adjusted so the handles are at shoulder level. Improper setup can lead to discomfort or strain.
- Don’t Rush the Reps: Focus on smooth, controlled reps to maximize shoulder activation and minimize the risk of injury. Fast reps can lead to poor form and reduce the effectiveness of the exercise.
- Breathing Technique: Exhale as you press up and inhale as you lower the weight. Proper breathing aids in maintaining rhythm and stability throughout the movement.
- Avoid Leaning Forward or Backward: Leaning can strain your lower back and neck. Ensure your back is fully supported by the seat and keep a neutral spine throughout the exercise.
- Gradual Progression: Avoid increasing the weight too quickly. It’s better to prioritize form over lifting heavy weights, especially in a machine exercise where proper alignment is crucial.
Progression Techniques for Building Stronger Shoulders
Once you’re comfortable with the basic motion, consider incorporating these progression techniques to continue challenging your shoulder muscles:
- Tempo Changes: Slow down the eccentric (lowering) phase to 3-5 seconds. This increases time under tension and stimulates muscle growth.
- Drop Sets: Perform a set to near-failure, then immediately reduce the weight and continue pressing. Drop sets help push the shoulders to fatigue, promoting muscular endurance and growth.
- Super Slow Reps: Try performing both the upward and downward motion at a slower pace, such as 5 seconds up and 5 seconds down, to fully engage the deltoids.
- Rest-Pause Sets: Do a set until you reach failure, then rest for 10-15 seconds, and continue with a few more reps. This technique enables you to push past typical muscle fatigue.
Why Shoulder Training Is Essential for Overall Strength and Stability
Strong shoulders are key to numerous upper body movements and are involved in a variety of daily activities. Shoulder stability also reduces the risk of injuries in sports and functional tasks. Additionally, having well-rounded shoulder muscles creates a balanced and visually appealing upper body, which is important for anyone looking to achieve an athletic physique.
Properly trained shoulders contribute to better posture, which is often compromised in today’s technology-driven world where people tend to hunch over their devices. Strong shoulders help open up the chest and reduce rounded shoulders, leading to an improved stance and greater confidence.
Wrapping Up: Making the Most of the Seated Shoulder Press Machine
The Seated Shoulder Press Machine is a foundational exercise for developing powerful, well-defined shoulders. With the controlled motion and support of the machine, you can safely target your deltoids, helping you build strength and muscle without compromising on form. For best results, incorporate this exercise with a mix of free-weight and machine-based shoulder movements to achieve balanced muscle growth and enhanced shoulder function.
By following the tips, techniques, and progression methods outlined in this guide, you’ll be well on your way to stronger, more resilient shoulders that not only look great but also support you in a range of physical activities. Prioritize form, start with manageable weights, and stay consistent to see continuous improvement in shoulder strength and definition.


